Please email me at:
Or use the form below.
[contact-form 1 “Contact form 1”]
The no-pants guide to spending, saving, and thriving in the real world.

No one likes to think about the possibility of dying too young. But knowing that potential exists, you take the smart step of protecting those you love by carrying term life insurance. But what about preventing the worst? Did you know your iPhone or Android device can call for help or record vital information if you ever find yourself in a life-threatening situation? Here are five personal safety apps that could save your life.
1) myGuardianAngel
Once this app allows you to reach all of your emergency contacts with the push of one button. You enter the contact information for anyone you would want to get in touch with if you were in any sort of emergency as soon as you download it. If you are in an emergency, the app will call your contacts, send them an e-mail with your GPS location and immediately begin recording audio and video from your phone.
2) StaySafe
This app is good for anyone who works or travels alone. You can schedule the app to automatically notify friends or family after a certain period of time when your phone is inactive. For example, you can estimate how long you expect to drive from one location to another on your own and then the phone will contact someone automatically if you are out of contact longer than expected. That way your friends will know to send help because something is wrong, even if you aren’t in a position to contact them yourself. StaySafe sends your contacts a detailed GPS location for you so that they can easily find you and bring help.
3) RESCUE
This full-service app can help you on the scene as well as notify your emergency contacts for you. If you are in trouble, you can trigger the app to sound a loud alarm that might frighten off anyone who might be planning to do you harm. The alarm can also help someone find you if you are lost or unable to move from your current location. When the alarm is triggered, the app will also send immediate notifications to your emergency contact list so that they can begin to send help right away. Emergency services such as the police and fire department can also be set for notification through the RESCUE app.
4) Night Recorder
This is a good app to have when you need to make a quick recording of your surroundings for any reason. The app can be set to begin recording at a touch. If you are stranded, you could create a recording by speaking about the landmarks you can see and explaining how you got to your current location. The recorder can then send an email of your recording to anyone on your contact list.
5) iWitness
With this app, you can instantly make video or audio recordings of your situation so that there is a permanent first-hand record of everything that happens. It is a handy tool for anyone who has been in a car accident or involved in a medical emergency because you can go back and look at the video to see exactly what happened if there is any question about it later. The app will also contact emergency services or your personal emergency contacts if you are in trouble. The built-in GPS locator will transmit your exact location so that people can find you quickly and easily.
Post by Term Life Insurance News
In this installment of the Make Extra Money series, I’m going to show you how to set up a WordPress site. I’m going to show you exactly what settings, plugins, and themes I use. I’m not going to get into writing posts today. That will be next time.
I use WordPress because it makes it easy to develop good-looking sites quickly. You don’t have to know html or any programming. I will be walking through the exact process using Hostgator, but most hosting plans use CPanel, so the instructions will be close. If not, just follow WordPress’s 5 minute installation guide.
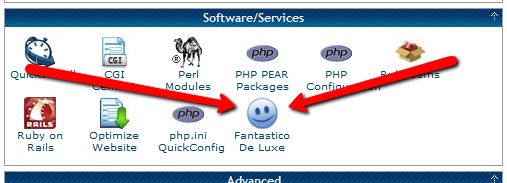
Assuming you can follow along with me, log in to your hosting account and find the section of your control panel labeled “Software/Service”. Click “Fantastico De Luxe”.

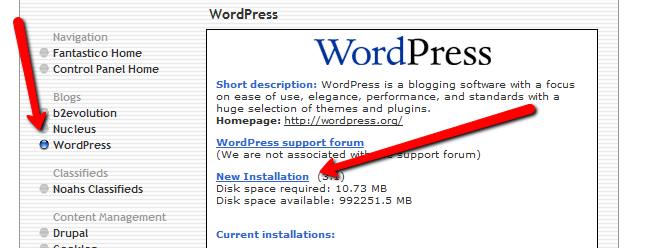
On the Fantastico screen, click WordPress, then “New Installation”.
On the next screen, select your domain name, then enter all of the details: admin username, password, site name, and site description. If you’ll remember, I bought the domain http://www.masterweddingplanning.net. I chose the site name of “Master Wedding Planning” and a description of “Everything You Need to Know to Plan Your Wedding”.
Click “install”, then “finish installation”. The final screen will contain a link to the admin page, in this case, masterweddingplanning.net/wp-admin. Go there and log in.
After you log in, if there is a message at the top of the screen telling you to update, do so. Keeping your site updated is the best way to avoid getting hacked. Click “Please update now” then “Update automatically”. Don’t worry about backing up, yet. We haven’t done anything worth saving.
Next, click “Settings” on the left. Under General Settings, put the www in the WordPress and site URLs. Click save, then log back in.
Click Posts, then Categories. Under “Add New Category”, create one called “Misc” and click save.
Click Appearance. This brings you to the themes page. Click “Install Themes” and search for one you like. I normally use Headway, but before I bought that, I used SimpleX almost exclusively. Your goal is to have a simple theme that’s easy to maintain and easy to read. Bells and whistles are a distraction.
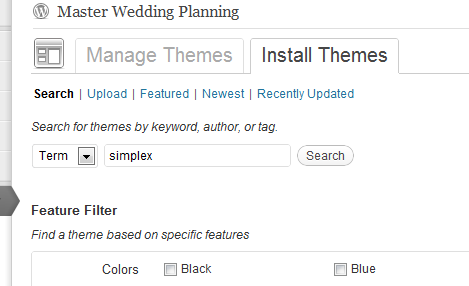
Click “Install”, “Install now”, and “Activate”. You now have a very basic WordPress site.
A plugin is an independent piece of software to make independent bits of WordPress magic happen. To install the perfect set of plugins, click Plugins on the left. Delete “Hello Dolly”, then click “Add new”.
In the search box, enter “plugin central” and click “Search plugins”. Plugin Central should be the first plugin in the list, so click “install”, then “ok”, then “activate plugin”. Congratulations, you’ve just installed your first plugin.
Now, on the left, you’ll see “Plugin Central” under Plugins. Click it. In the Easy Plugin Installation box, copy and paste the following:
 All in One SEO Pack
 Contact Form 7
 WordPress Database Backup
 SEO SearchTerms Tagging 2
 WP Super Cache
 Conditional CAPTCHA for WordPress
 date exclusion seo
 WP Policies
 Pretty Link Lite
 google xml sitemaps
 Jetpack by WordPress.com
Click “install”.
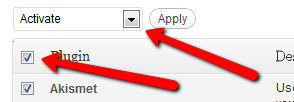
On the left, click “Installed Plugins”. On the next screen, click the box next to “Plugins”, then select “Activate” from the dropdown and click apply.
Still under Plugins, click “Akismet Configuration”. Enter your API key and hit “update options”. You probably don’t have one, so click “get your key”.
The only tool I worry about is the backup. It’s super-easy to set up. Click “Tools”, then “Backup”. 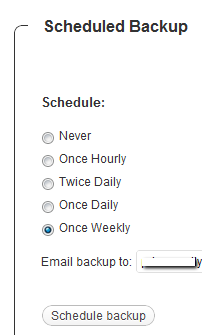
Scroll down to “Schedule Backups”, select weekly, make sure it’s set to a good email address and click “Schedule Backup”. I only save weekly because we won’t be adding daily content. Weekly is safe enough, without filling up your email inbox.
There are a lot of settings we’re going to set. This is going to make the site more usable and help the search engines find your site. We’re going to go right down the list. If you see a section that I don’t mention, it’s because the defaults are good enough.
Set the Default Post Category to “Misc”.
Visit this page and copy the entire list into “Update Service” box. This will make the site ping a few dozen services every time you publish a post. It’s a fast way to get each post indexed by Google.
Click “Save Changes”.
Uncheck everything under “Email me whenever…” and hit save. This lets people submit comments, without actually posting the comments or emailing me when they do so. Every once in a while, I go manually approve the comments, but I don’t make it a priority.
Select “Custom structure” and enter this: /%postname%/
Click save.
Set the status to “Enabled”, then fill out the site title and description. Keep the description to about 160 characters. This is what builds the blurb that shows up by the link when you site shows up in Google’s results.
Check the boxes for “Use categories for META keywords” and “Use noindex for tag archives”.
Click “Update Options”.
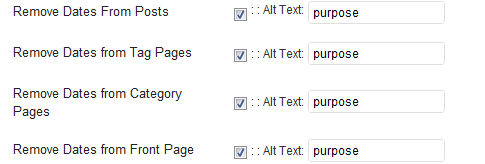
Check the boxes to remove each of the dates and set the alt text to “purpose” or something. This will suppress the date so your posts won’t look obsolete.
This plugin reinforces the searches that bring people to your site. It’s kind of neat. Skip the registration, accept the defaults and hit save.
Scroll to the bottom and click import. We’ll come back to this.
Select “Caching On” and hit save.
Across the top of the screen should be a giant banner telling you to connect to WordPress.com and set up Jetpack. You’ll need an account on WordPress.com, so go there and set one up. After authorizing the site, you’ll be brought back to the Jetpack configuration screen. Click “Configure” under “WordPress.com Stats”. Take the defaults and hit save.
On the contact configuration page, copy the code in the top section. You’ll need this in a moment.
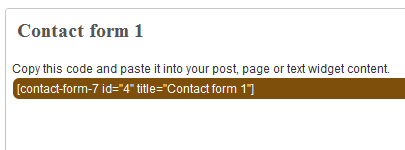
Now, we going to create a couple of static pages. On the left, click “Pages”, then “Add new”.
Name the first page “Contact” and put the contact form code in the body of the page. Hit publish.
Under Appearance, click “Menu”. Enter a menu name and hit save.
Then, under “Pages”, click the box next to “Contact”, “Disclaimer”, and any other policies you’d like to display. Hit save.
Also under Appearance, click “Widgets”. This is where you’ll select what will display in the sidebar. All you have to do is drag the boxes you want from the middle of the page to the widget bar on the right. I recommend Text, Search, Recent Posts, Popular Search Terms and Tag Cloud. In the text box, just put some placeholder text in it, like “Product will go here”. We’ll address this next time.
We’re not going to worry about getting posts in place, yet. That will be the next installment. However, the steps in the next installment could take 2 weeks to implement, and we want Google to start paying attention now. To make that happen, we need to get a little bit of content in place. This won’t be permanent content. It’s only there so Google has something to see when it comes crawling.
To get this temporary, yet legal content, I use eZineArticles. Just go search for something in your niche that doesn’t look too spammy.
Then, click “Posts”, then delete the “Hello World” post. Click “Add new”. Copy the eZine article, being sure to include the author box at the bottom, and hit publish.
To see your changes, you may have to go to Settings, then WP Cache and delete the cache so your site will refresh.
Congratulations! You now have a niche blog with content. It’s not ready to make you any money, yet, but it is ready for Google to start paying attention. In the next installment, I’ll show you how I get real unique content and set it up so Google keeps coming back to show me the love.
This is a continuation of the budget series. See these posts for the history of this series.
This time, I’m looking at our discretionary budget. These are the things that don’t have a fixed cost. Any individual item is largely optional, and, ultimately, we don’t track these purchases closely. At the beginning of the month, I pull this money out of the bank in cash, except for 1 category. When the discretionary budget is gone, it’s gone.
We’ve now addressed out entire budget, including what we can do and have done to keep our costs under control. Looking back, I don’t see too many cuts I’ve missed.

…err, no more car loan. I paid off my car this week, a year early! Now I’m down to 2 debts: a credit card with an embarrassingly high balance and my mortgage. We’re rocking the debt snowball!
INGDirect is having a sweet promotion. Open a checking account, use it three times in 45 days, and get $50 free. Free money is the best kind. I love my ING account and keep all of my savings there. If you don’t have an account there, yet, now is a great time to open one.
This month, I am trying to establish the Slow Carb Diet as a habit. At the end of the month, I’ll see what the results were and decide if it’s worth continuing. For those who don’t know, the Slow Carb Diet involves cutting out potatoes, rice, flour, sugar, and dairy in all their forms. My meals consist of 40% proteins, 30% vegetables, and 30% legumes(beans or lentils). There is no calorie counting, just some specific rules, accompanied by a timed supplement regimen and some timed exercises to manipulate my metabolism. The supplements are NOT effedrin-based diet pills, or, in fact, uppers of any kind. There is also a weekly cheat day, to cut the impulse to cheat and to avoid letting my body go into famine mode.
I’m measuring two metrics, my weight and the total inches of my waist , hips, biceps, and thighs. Between the two, I should have an accurate assessment of my progress.
Weight: I have lost 17 pounds since January 2nd. That’s 6 pounds since last week. I cheated this week and had a slice of toast and 6 croutons with my grilled chicken-but-no-cheese salad.
Total Inches: I have lost 9 inches in the same time frame, down 3.5 since last week.
Naturally, the first week is the most dramatic. That’s when my body was flushing most of the garbage I’d been eating, including holiday feasts. I’ll have a hard time complaining about 6 pounds in a week. My guess is that I drop another 10-15 pounds by the end of the month, bringing the average to about 1 pound per day. Over time, that will drop as my base caloric burn drops to match my new weight.
Realized Returns is giving away a Kindle. I would greatly appreciate it if you didn’t enter, because I’d love to get a Kindle.
Maximizing Money has put together a stellar list of financial blogs. If I’m not enough to keep you going, take a look at that list.
Mystery shopping sounds like it could be such a sweet deal for some people. Always try to make money doing what you love.
Here is another list of sites that can make you some money. I love side hustles.
And finally, here is Lifehacker, showing you how to make better cocoa.
This is where I review the posts I wrote one year ago.
I wrote a post on saving money while cooking. This post has easily withstood the test of time. We keep getting better at stretching our budget. Over the last year, we’ve actually reduced our food budget by an additional $50 per month, while the quality of our meals has gone up.
This was the first week I posted a 30 Day Project update. My first goal was to start waking up at 5AM. That worked well for almost the entire year, but I’ve let that slack off over the last few months. On the weekends, I don’t set an alarm or try to get up early, but I’m still up by 7:30, usually. During the week, my alarm goes off at 5:10, but I let myself snooze it. I’ve discovered that I do better at attending to my personal projects(like blogging) late at night instead of early in the morning. So, I’m going with what works, instead of trying to force what doesn’t.
I also reviewed the bills I pay that aren’t paid monthly in my third budget lesson.
First 3 Things to Do in the New Year was included in Crystal’s rockin’ new Total Money Carnival.
4 Ways We Keep Wasting Money was included in the Festival of Frugality.
Living the XBox Life on an Atari Income was included in the Carnival of Personal Finance.
Swamp Finance was hosted by Squirrelers.
I ran the guest post, The Best Financial Advice I Ever Received for Saving Money Today.
Thank you! If I missed anyone, please let me know.
There are so many ways you can read and interact with this site.
You can subscribe by RSS and get the posts in your favorite news reader. I prefer Google Reader.
You can subscribe by email and get, not only the posts delivered to your inbox, but occasional giveaways and tidbits not available elsewhere.
You can ‘Like’ LRN on Facebook. Facebook gets more use than Google. It can’t hurt to see what you want where you want.
You can follow LRN on Twitter. This comes with some nearly-instant interaction.
You can send me an email, telling me what you liked, what you didn’t like, or what you’d like to see more(or less) of. I promise to reply to any email that isn’t purely spam.
That’s all for today. Have a great weekend!
Today, I am continuing the detailed examination of my budget. Please see part one to catch up.

This time, I’m going to look at my monthly bills. These are predictable and recurring expenses, though not all of them are entirely out-going.
Let’s dig in: [Read more…] about Budget Lesson, Part 2