Please email me at:
Or use the form below.
[contact-form 1 “Contact form 1”]
The no-pants guide to spending, saving, and thriving in the real world.

No one likes to think about the possibility of dying too young. But knowing that potential exists, you take the smart step of protecting those you love by carrying term life insurance. But what about preventing the worst? Did you know your iPhone or Android device can call for help or record vital information if you ever find yourself in a life-threatening situation? Here are five personal safety apps that could save your life.
1) myGuardianAngel
Once this app allows you to reach all of your emergency contacts with the push of one button. You enter the contact information for anyone you would want to get in touch with if you were in any sort of emergency as soon as you download it. If you are in an emergency, the app will call your contacts, send them an e-mail with your GPS location and immediately begin recording audio and video from your phone.
2) StaySafe
This app is good for anyone who works or travels alone. You can schedule the app to automatically notify friends or family after a certain period of time when your phone is inactive. For example, you can estimate how long you expect to drive from one location to another on your own and then the phone will contact someone automatically if you are out of contact longer than expected. That way your friends will know to send help because something is wrong, even if you aren’t in a position to contact them yourself. StaySafe sends your contacts a detailed GPS location for you so that they can easily find you and bring help.
3) RESCUE
This full-service app can help you on the scene as well as notify your emergency contacts for you. If you are in trouble, you can trigger the app to sound a loud alarm that might frighten off anyone who might be planning to do you harm. The alarm can also help someone find you if you are lost or unable to move from your current location. When the alarm is triggered, the app will also send immediate notifications to your emergency contact list so that they can begin to send help right away. Emergency services such as the police and fire department can also be set for notification through the RESCUE app.
4) Night Recorder
This is a good app to have when you need to make a quick recording of your surroundings for any reason. The app can be set to begin recording at a touch. If you are stranded, you could create a recording by speaking about the landmarks you can see and explaining how you got to your current location. The recorder can then send an email of your recording to anyone on your contact list.
5) iWitness
With this app, you can instantly make video or audio recordings of your situation so that there is a permanent first-hand record of everything that happens. It is a handy tool for anyone who has been in a car accident or involved in a medical emergency because you can go back and look at the video to see exactly what happened if there is any question about it later. The app will also contact emergency services or your personal emergency contacts if you are in trouble. The built-in GPS locator will transmit your exact location so that people can find you quickly and easily.
Post by Term Life Insurance News
Today, I am continuing the series, Money Problems: 30 Days to Perfect Finances. The series will consist of 30 things you can do in one setting to perfect your finances. It’s not a system to magically make your debt disappear. Instead, it is a path to understanding where you are, where you want to be, and–most importantly–how to bridge the gap.
I’m not running the series in 30 consecutive days. That’s not my schedule. Also, I think that talking about the same thing for 30 days straight will bore both of us. Instead, it will run roughly once a week. To make sure you don’t miss a post, please take a moment to subscribe, either by email or rss.
On this, Day 7, we’re going to talk about paying off debt.
Until you pay off your debts, you are living with an anchor around your neck, keeping you from doing the things you love. Take a look at the amount you are paying to your debt-holders each month. How could you better use that money, now? A vacation, private school for your kids, a reliable car?
If you’ve got a ton of debt, the real cost is in missed opportunities. For example, with my son’s vision therapy being poorly covered by our insurance plan, we are planning a much smaller vacation this summer–a “staycation”–instead of a trip to the Black Hills. If we didn’t have a debt payment to worry about, we’d have a much larger savings and would have been able to absorb the cost without canceling other plans. The way it is, our poor planning and reliance on debt over the last 10 years have cost us the opportunity to go somewhere new.
The only way to regain the ability to take advantage of future opportunities is to get out of debt, which tends to be an intimidating thought. When we started on our journey out of debt, we were buried 6 figures deep, with a credit card balance that matched our mortgage. It looked like an impossible obstacle, but we’ve been making it happen. The secret is to make a plan and stick with it. Pick some kind of plan, and follow it until you are done. Don’t give up and don’t get discouraged.
What kind of plan should you pick? That’s a personal choice. What motivates you? Do you want to see quick progress or do you like seeing the effects of efficient, long-term planning? These are the most common options:
Popularized by Dave Ramsey, this is the plan with the greatest emotional effect. It’s bad math, but that doesn’t matter, if the people using it are motivated to keep at it long enough to get out of debt.
To prepare your debt snowball, take all of your debts–no matter how small–and arrange them in order of balance. Ignore the interest rate. You’re going to pay the minimum payment on each of your debts, except for the smallest balance. That one will get every spare cent you can throw at it. When the smallest debt is paid off, that payment and every spare cent you were throwing at it(your “snowball”) will go to the next smallest debt. As the smallest debts are paid off, your snowball will grow and each subsequent debt will be paid off faster that you will initially think possible. You will build up a momentum that will shrink your debts quickly.
This is the plan I am using.
A debt avalanche is the most efficient repayment plan. It is the plan that will, in the long-term, involve paying the least amount of interest. It’s a good thing. The downside is that it may not come with the “easy wins” that you get with the debt snowball. It is the best math; you’ll get out of debt fastest using this plan, but it’s not the most emotionally motivating.
To set this one up, you’ll take all of your bills–again–and line them up, but this time, you’ll do it strictly by interest rate. You’re going to make every minimum payment, then you’ll focus on paying the bill with the highest interest rate, first, with every available penny.
This is the plan promoted by David Bach. It stands for Done On Last Payment. With this plan, you’ll pay the minimum payment on each debt, except for bill that is scheduled to be paid off first. You calculate this by dividing the balance of each debt by the minimum payment. This gives you an estimate of the number of months it will take to pay off each debt.
This system is less efficient than the debt avalanche–by strict math–but is better than the snowball. It give you “quick wins” faster than the snowball, but will cost a bit more than the avalanche. It’s a compromise between the two, blending the emotional satisfaction of the snowball with the better math of the avalanche.
For each of these plans, you can give them a little steroid injection by snowflaking. Snowflaking is the art of making some extra cash, and throwing it straight at your debt. If you hold a yard sale, use the proceeds to make an extra debt payment. Sell some movies at the pawn shop? Make an extra car payment. Every little payment you make means fewer dollars wasted on interest.
Paying interest means you are paying for everything you buy…again. Do whatever it takes to make debt go away, and you will find yourself able to take advantage of more opportunities and spend more time doing the things you want to do. Life will be less stressful and rainbows will follow you through your day. Unicorns will guard your home and leprechauns will chase away evil-doers. The sun will always shine and stoplights will never show red. Getting out of debt is powerful stuff.
Your task today is to pick a debt plan, and get on it. Whichever plan works best for you is the right one. Organize your bills, pick one to focus on, and go to it.
Assuming you are in debt, how are you paying it off?
In this installment of the Make Extra Money series, I’m going to show you how to set up a WordPress site. I’m going to show you exactly what settings, plugins, and themes I use. I’m not going to get into writing posts today. That will be next time.
I use WordPress because it makes it easy to develop good-looking sites quickly. You don’t have to know html or any programming. I will be walking through the exact process using Hostgator, but most hosting plans use CPanel, so the instructions will be close. If not, just follow WordPress’s 5 minute installation guide.
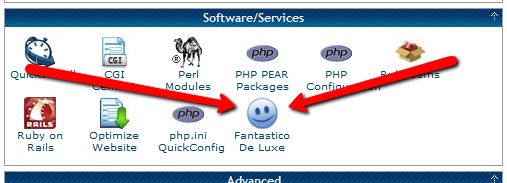
Assuming you can follow along with me, log in to your hosting account and find the section of your control panel labeled “Software/Service”. Click “Fantastico De Luxe”.

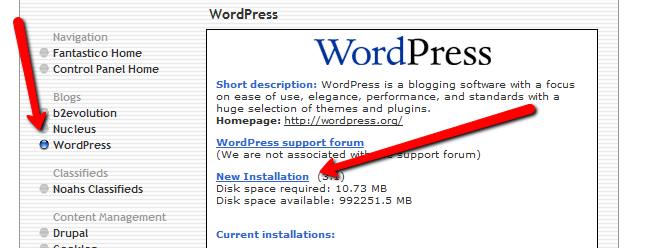
On the Fantastico screen, click WordPress, then “New Installation”.
On the next screen, select your domain name, then enter all of the details: admin username, password, site name, and site description. If you’ll remember, I bought the domain http://www.masterweddingplanning.net. I chose the site name of “Master Wedding Planning” and a description of “Everything You Need to Know to Plan Your Wedding”.
Click “install”, then “finish installation”. The final screen will contain a link to the admin page, in this case, masterweddingplanning.net/wp-admin. Go there and log in.
After you log in, if there is a message at the top of the screen telling you to update, do so. Keeping your site updated is the best way to avoid getting hacked. Click “Please update now” then “Update automatically”. Don’t worry about backing up, yet. We haven’t done anything worth saving.
Next, click “Settings” on the left. Under General Settings, put the www in the WordPress and site URLs. Click save, then log back in.
Click Posts, then Categories. Under “Add New Category”, create one called “Misc” and click save.
Click Appearance. This brings you to the themes page. Click “Install Themes” and search for one you like. I normally use Headway, but before I bought that, I used SimpleX almost exclusively. Your goal is to have a simple theme that’s easy to maintain and easy to read. Bells and whistles are a distraction.
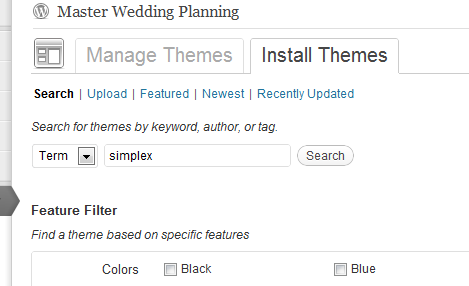
Click “Install”, “Install now”, and “Activate”. You now have a very basic WordPress site.
A plugin is an independent piece of software to make independent bits of WordPress magic happen. To install the perfect set of plugins, click Plugins on the left. Delete “Hello Dolly”, then click “Add new”.
In the search box, enter “plugin central” and click “Search plugins”. Plugin Central should be the first plugin in the list, so click “install”, then “ok”, then “activate plugin”. Congratulations, you’ve just installed your first plugin.
Now, on the left, you’ll see “Plugin Central” under Plugins. Click it. In the Easy Plugin Installation box, copy and paste the following:
 All in One SEO Pack
 Contact Form 7
 WordPress Database Backup
 SEO SearchTerms Tagging 2
 WP Super Cache
 Conditional CAPTCHA for WordPress
 date exclusion seo
 WP Policies
 Pretty Link Lite
 google xml sitemaps
 Jetpack by WordPress.com
Click “install”.
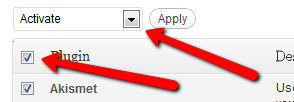
On the left, click “Installed Plugins”. On the next screen, click the box next to “Plugins”, then select “Activate” from the dropdown and click apply.
Still under Plugins, click “Akismet Configuration”. Enter your API key and hit “update options”. You probably don’t have one, so click “get your key”.
The only tool I worry about is the backup. It’s super-easy to set up. Click “Tools”, then “Backup”. 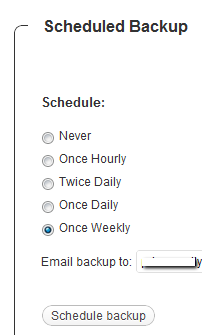
Scroll down to “Schedule Backups”, select weekly, make sure it’s set to a good email address and click “Schedule Backup”. I only save weekly because we won’t be adding daily content. Weekly is safe enough, without filling up your email inbox.
There are a lot of settings we’re going to set. This is going to make the site more usable and help the search engines find your site. We’re going to go right down the list. If you see a section that I don’t mention, it’s because the defaults are good enough.
Set the Default Post Category to “Misc”.
Visit this page and copy the entire list into “Update Service” box. This will make the site ping a few dozen services every time you publish a post. It’s a fast way to get each post indexed by Google.
Click “Save Changes”.
Uncheck everything under “Email me whenever…” and hit save. This lets people submit comments, without actually posting the comments or emailing me when they do so. Every once in a while, I go manually approve the comments, but I don’t make it a priority.
Select “Custom structure” and enter this: /%postname%/
Click save.
Set the status to “Enabled”, then fill out the site title and description. Keep the description to about 160 characters. This is what builds the blurb that shows up by the link when you site shows up in Google’s results.
Check the boxes for “Use categories for META keywords” and “Use noindex for tag archives”.
Click “Update Options”.
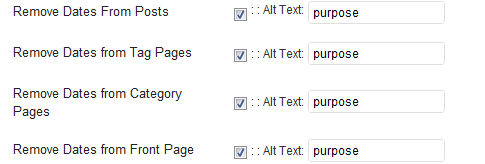
Check the boxes to remove each of the dates and set the alt text to “purpose” or something. This will suppress the date so your posts won’t look obsolete.
This plugin reinforces the searches that bring people to your site. It’s kind of neat. Skip the registration, accept the defaults and hit save.
Scroll to the bottom and click import. We’ll come back to this.
Select “Caching On” and hit save.
Across the top of the screen should be a giant banner telling you to connect to WordPress.com and set up Jetpack. You’ll need an account on WordPress.com, so go there and set one up. After authorizing the site, you’ll be brought back to the Jetpack configuration screen. Click “Configure” under “WordPress.com Stats”. Take the defaults and hit save.
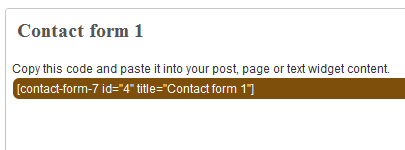
On the contact configuration page, copy the code in the top section. You’ll need this in a moment.
Now, we going to create a couple of static pages. On the left, click “Pages”, then “Add new”.
Name the first page “Contact” and put the contact form code in the body of the page. Hit publish.
Under Appearance, click “Menu”. Enter a menu name and hit save.
Then, under “Pages”, click the box next to “Contact”, “Disclaimer”, and any other policies you’d like to display. Hit save.
Also under Appearance, click “Widgets”. This is where you’ll select what will display in the sidebar. All you have to do is drag the boxes you want from the middle of the page to the widget bar on the right. I recommend Text, Search, Recent Posts, Popular Search Terms and Tag Cloud. In the text box, just put some placeholder text in it, like “Product will go here”. We’ll address this next time.
We’re not going to worry about getting posts in place, yet. That will be the next installment. However, the steps in the next installment could take 2 weeks to implement, and we want Google to start paying attention now. To make that happen, we need to get a little bit of content in place. This won’t be permanent content. It’s only there so Google has something to see when it comes crawling.
To get this temporary, yet legal content, I use eZineArticles. Just go search for something in your niche that doesn’t look too spammy.
Then, click “Posts”, then delete the “Hello World” post. Click “Add new”. Copy the eZine article, being sure to include the author box at the bottom, and hit publish.
To see your changes, you may have to go to Settings, then WP Cache and delete the cache so your site will refresh.
Congratulations! You now have a niche blog with content. It’s not ready to make you any money, yet, but it is ready for Google to start paying attention. In the next installment, I’ll show you how I get real unique content and set it up so Google keeps coming back to show me the love.

This is a guest post.
The goal of any business is to maximize profits while limiting expenses. Yet sometimes, a business may need a certain piece of equipment for a special project or other task. For example, a flatbed truck may be needed sometimes, but not enough times to justify spending the money to buy one. When this is the case, renting the truck becomes the smart option.
Renting a flatbed truck is perfect when working with heavy, oversized or irregular shaped cargo. Many times these trucks may only be needed for one or two days, perhaps only a few hours. When this is the case, renting a truck makes perfect sense. Any town and city has numerous rental truck options from which to choose, with the most popular brand being U-Haul. Flatbed trucks come in a variety of sizes, ranging from 8-22 feet in length. They can be rented for several days or only a couple of hours, depending on one’s needs. If necessary, the trucks can also be rented on a weekly or monthly basis.
A truck hire can also be very cost-effective for a business. Buying a flatbed truck can cost a business $40,000-$50,000 or possibly more, depending on the size of the truck. As with any new vehicle purchase, as soon as it’s driven off the dealer’s lot it begins to depreciate, therefore giving a business owner an investment whose value is less and less as time goes by. By renting a truck only when necessary, it saves a business substantially in terms of making a capital investment. Rental prices vary among different businesses, with most averaging $50-$100 per day depending on the truck that’s rented. Generally, the bigger the truck the more it costs to rent. There are usually no hidden charges or fees associated with renting trucks, so long as they are returned on time, in good condition and with the same amount of fuel they had when they left the rental lot. Also, the person who rents the truck is not the only person allowed to drive it. Most rental places allow up to three other people to be added to the driver’s list for an additional fee, often averaging around $10.
Most truck rental places allow reservations to be made online, and payments can be made with credit cards. Reserving online and paying with a credit card allows a business to take advantage of discounts, for most businesses will offer discounts for reserving online. Those who drive flatbed trucks only need to be at least 18 years old with a valid driver’s license, and the trucks do not require any special licenses to operate.
Many companies also provide 24/7 roadside assistance for renters, so if the truck breaks down while being used it can be picked up and replaced at no charge. With all these benefits, it makes far more sense for a business to rent a truck for its occasional needs rather than purchase one for a task now and then.

It’s been a month(again!) since I’ve written a post for the budget series, so I’ll be continuing that today. See these posts for the history of this series.
This time, I’m looking at how to reduce my “set aside” funds. These are the categories that don’t have specific payout amounts and happen at irregular intervals. One of the convenient features of our set-aside funds–also a feature of our non-monthly bills–is that the money sits in our checking account, providing a buffer against overdrafts. The buffer is big enough that I can withdraw our entire month’s discretionary budget on the first of the month.
I’ve taken a hard look at most of the bills over time, so there isn’t always a lot to cut. Next time, I’ll be addressing our discretionary spending.