Please email me at:
Or use the form below.
[contact-form 1 “Contact form 1”]
The no-pants guide to spending, saving, and thriving in the real world.
In this installment of the Make Extra Money series, I’m going to show you how to set up a WordPress site. I’m going to show you exactly what settings, plugins, and themes I use. I’m not going to get into writing posts today. That will be next time.
I use WordPress because it makes it easy to develop good-looking sites quickly. You don’t have to know html or any programming. I will be walking through the exact process using Hostgator, but most hosting plans use CPanel, so the instructions will be close. If not, just follow WordPress’s 5 minute installation guide.
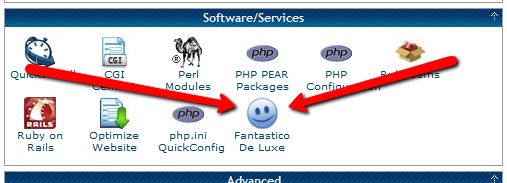
Assuming you can follow along with me, log in to your hosting account and find the section of your control panel labeled “Software/Service”. Click “Fantastico De Luxe”.

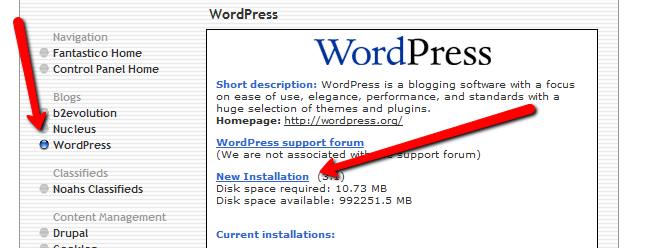
On the Fantastico screen, click WordPress, then “New Installation”.
On the next screen, select your domain name, then enter all of the details: admin username, password, site name, and site description. If you’ll remember, I bought the domain http://www.masterweddingplanning.net. I chose the site name of “Master Wedding Planning” and a description of “Everything You Need to Know to Plan Your Wedding”.
Click “install”, then “finish installation”. The final screen will contain a link to the admin page, in this case, masterweddingplanning.net/wp-admin. Go there and log in.
After you log in, if there is a message at the top of the screen telling you to update, do so. Keeping your site updated is the best way to avoid getting hacked. Click “Please update now” then “Update automatically”. Don’t worry about backing up, yet. We haven’t done anything worth saving.
Next, click “Settings” on the left. Under General Settings, put the www in the WordPress and site URLs. Click save, then log back in.
Click Posts, then Categories. Under “Add New Category”, create one called “Misc” and click save.
Click Appearance. This brings you to the themes page. Click “Install Themes” and search for one you like. I normally use Headway, but before I bought that, I used SimpleX almost exclusively. Your goal is to have a simple theme that’s easy to maintain and easy to read. Bells and whistles are a distraction.
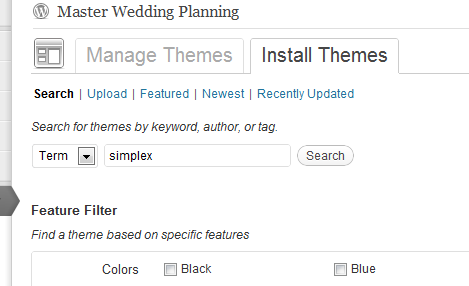
Click “Install”, “Install now”, and “Activate”. You now have a very basic WordPress site.
A plugin is an independent piece of software to make independent bits of WordPress magic happen. To install the perfect set of plugins, click Plugins on the left. Delete “Hello Dolly”, then click “Add new”.
In the search box, enter “plugin central” and click “Search plugins”. Plugin Central should be the first plugin in the list, so click “install”, then “ok”, then “activate plugin”. Congratulations, you’ve just installed your first plugin.
Now, on the left, you’ll see “Plugin Central” under Plugins. Click it. In the Easy Plugin Installation box, copy and paste the following:
 All in One SEO Pack
 Contact Form 7
 WordPress Database Backup
 SEO SearchTerms Tagging 2
 WP Super Cache
 Conditional CAPTCHA for WordPress
 date exclusion seo
 WP Policies
 Pretty Link Lite
 google xml sitemaps
 Jetpack by WordPress.com
Click “install”.
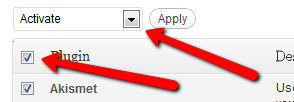
On the left, click “Installed Plugins”. On the next screen, click the box next to “Plugins”, then select “Activate” from the dropdown and click apply.
Still under Plugins, click “Akismet Configuration”. Enter your API key and hit “update options”. You probably don’t have one, so click “get your key”.
The only tool I worry about is the backup. It’s super-easy to set up. Click “Tools”, then “Backup”. 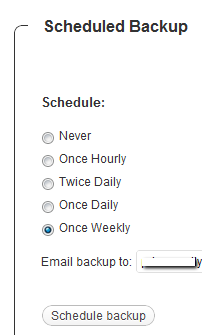
Scroll down to “Schedule Backups”, select weekly, make sure it’s set to a good email address and click “Schedule Backup”. I only save weekly because we won’t be adding daily content. Weekly is safe enough, without filling up your email inbox.
There are a lot of settings we’re going to set. This is going to make the site more usable and help the search engines find your site. We’re going to go right down the list. If you see a section that I don’t mention, it’s because the defaults are good enough.
Set the Default Post Category to “Misc”.
Visit this page and copy the entire list into “Update Service” box. This will make the site ping a few dozen services every time you publish a post. It’s a fast way to get each post indexed by Google.
Click “Save Changes”.
Uncheck everything under “Email me whenever…” and hit save. This lets people submit comments, without actually posting the comments or emailing me when they do so. Every once in a while, I go manually approve the comments, but I don’t make it a priority.
Select “Custom structure” and enter this: /%postname%/
Click save.
Set the status to “Enabled”, then fill out the site title and description. Keep the description to about 160 characters. This is what builds the blurb that shows up by the link when you site shows up in Google’s results.
Check the boxes for “Use categories for META keywords” and “Use noindex for tag archives”.
Click “Update Options”.
Check the boxes to remove each of the dates and set the alt text to “purpose” or something. This will suppress the date so your posts won’t look obsolete.

This plugin reinforces the searches that bring people to your site. It’s kind of neat. Skip the registration, accept the defaults and hit save.
Scroll to the bottom and click import. We’ll come back to this.
Select “Caching On” and hit save.
Across the top of the screen should be a giant banner telling you to connect to WordPress.com and set up Jetpack. You’ll need an account on WordPress.com, so go there and set one up. After authorizing the site, you’ll be brought back to the Jetpack configuration screen. Click “Configure” under “WordPress.com Stats”. Take the defaults and hit save.
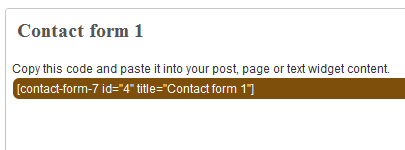
On the contact configuration page, copy the code in the top section. You’ll need this in a moment.
Now, we going to create a couple of static pages. On the left, click “Pages”, then “Add new”.
Name the first page “Contact” and put the contact form code in the body of the page. Hit publish.
Under Appearance, click “Menu”. Enter a menu name and hit save.
Then, under “Pages”, click the box next to “Contact”, “Disclaimer”, and any other policies you’d like to display. Hit save.
Also under Appearance, click “Widgets”. This is where you’ll select what will display in the sidebar. All you have to do is drag the boxes you want from the middle of the page to the widget bar on the right. I recommend Text, Search, Recent Posts, Popular Search Terms and Tag Cloud. In the text box, just put some placeholder text in it, like “Product will go here”. We’ll address this next time.
We’re not going to worry about getting posts in place, yet. That will be the next installment. However, the steps in the next installment could take 2 weeks to implement, and we want Google to start paying attention now. To make that happen, we need to get a little bit of content in place. This won’t be permanent content. It’s only there so Google has something to see when it comes crawling.
To get this temporary, yet legal content, I use eZineArticles. Just go search for something in your niche that doesn’t look too spammy.
Then, click “Posts”, then delete the “Hello World” post. Click “Add new”. Copy the eZine article, being sure to include the author box at the bottom, and hit publish.
To see your changes, you may have to go to Settings, then WP Cache and delete the cache so your site will refresh.
Congratulations! You now have a niche blog with content. It’s not ready to make you any money, yet, but it is ready for Google to start paying attention. In the next installment, I’ll show you how I get real unique content and set it up so Google keeps coming back to show me the love.
I keep calling these lessons, but they are examples and explanations, more than lessons. Names aside, please see Part 1 and Part 2 to catch up. The Google Doc of this example is here.

This time, I’m going to review my non-monthly bills. These are the bills that have to be paid, but not on a monthly basis. Some are annual, others are quarterly, or even weekly. Every month, the amount–adjusted to the monthly equivalent–is set aside in Quicken.
There aren’t too many items here that can be legitimately and responsibly trimmed.
This is a continuation of the budget series. See these posts for the history of this series.
This time, I’m looking at our discretionary budget. These are the things that don’t have a fixed cost. Any individual item is largely optional, and, ultimately, we don’t track these purchases closely. At the beginning of the month, I pull this money out of the bank in cash, except for 1 category. When the discretionary budget is gone, it’s gone.
We’ve now addressed out entire budget, including what we can do and have done to keep our costs under control. Looking back, I don’t see too many cuts I’ve missed.
Ever since she was a little girl, my wife has wanted to be a horse. Err, work with horses.

The problem is that most jobs working with horses pay horse-crap. It’s hard to raise a family on a stablehand’s income.
Her alternative was to own horses. This comes with a different set of problems. The biggest problem is that we live on 1/8 of an acre in a first-ring suburb. That’s not a lot of room to graze, though I would be willing to give up my spot in the garage.
I rock like that.
Boarding a horse costs a minimum of $200 per month. Two girls means two horses, otherwise, they won’t both be able to score in the saddle club. For the math challenged, that’s $400 per month, plus about $300 in preventative vet care per year.
$5100 for a year of boarding an extremely obsolete car.
Then, you need a trailer to get the horse to shows. You need saddles and reins and and short-legged stirrups and feedbags and muck-rakes and brushes and combs and hoof-cleaning-thingies and other stuff that will catch me by surprise for years to come.
Expensive.
My rough estimate is that it costs at least $10,000 to get into horse ownership, and that’s not counting the horse itself.
You can buy a horse for well under $1000 if you aren’t concerned about registration or speed. A 15 year old horse can last 10-15 more years, so it’s not money down the drain.
That’s $12,000 to get in and $5100 per year to stay in. Minimum.
Never let it be said that I’m not a pushover. Last month, we bought an SUV that can pull a horse trailer. Last weekend, we bought the trailer. That’s two major steps towards making my wife’s dreams come true. The rest of the plan culminates in a hobby farm in the sticks.
There are several steps in between.
I just need to put the brakes on every other step. We’ve been offered the free use of one pony next season, and we may be able to get another for the same price. Beyond that, we need to be patient. There will be no ponies purchased until the new truck and old mortgage are paid.
Period.
When you are up to your eyeballs in debt, praying for a step-stool, sometimes life–more accurately, con-artists–try to trip you when you are vulnerable and look for a solution. They aren’t muggers on the street. They come at you wearing ties, invite you to a real office, with real furniture and a real nameplate on a real desk. They are a real company, but that doesn’t mean they aren’t trying to scam you out of the little money you have left to put towards your debt.
Yes, I am talking about debt management scams. These scams come in 4 main varieties.
Debt Settlement companies instruct you to stop paying your bills completely and send them the money instead to be placed in a settlement fund. When your creditors get desperate enough, they will be willing to settle for pennies on the dollar.
In theory, this can be a good strategy for some debtors. Unfortunately, it has some drawbacks, even if the company is legitimate. They tend to charge high fees as a percentage of your deposits. Some take another fee when a settlement is accepted. The entire time you are building your settlement fund, your credit rating is sinking, leaving you open to being sued or garnished. The bad companies take the fund and run, while even the good companies can’t guarantee your creditors will play ball.
Ultimately, they aren’t doing anything you can’t easily do yourself. If you want to go the settlement route, stop making your payments and funnel the money into a savings account that you will use to offer settlements from. It takes discipline, but there is no upside to paying someone else for the same function.
Debt Management plans are used when you owe more than you can afford to pay. These companies work with your creditors to adjust interest rates and minimum payments and they try to get some fees waived for you.
A good company will work with you and your creditors to make sure everyone is working together towards the goal of eliminating the debt. A bad company will tell you they are working with your creditors while ignoring any contact from the creditor. They’ll tell you the creditor isn’t willing to negotiate while never stepping up to the negotiation table. Another trick is to offer the creditor a set payment, with a “take it or leave it” clause. Any input from the creditor is interpreted as a refusal to participate. This, coupled with high fees paid by the debtor, make debt management firms a risky proposition. Most states require the firms to be licensed. Check to make sure they are before giving them any information.
Debt/Credit Counseling companies work with you to establish a budget and eliminate expenses; in effect, they are training you to be in control of your finances. They are often organized as a nonprofit, but not always.
Some–the sleazy ones–lie about what they are doing, or attempt to misconstrue what you are agreeing too. Be careful not to use your home as collateral to consolidate unsecured debt and don’t walk into a Chapter 13 bankruptcy without that being your intention. Both of those are common debt counseling scams. If the company isn’t able to provide all of the details of a transaction–company name, address, licensing information–or they aren’t willing to spend as much time as necessary explaining the details of the transaction, walk away. This is your life, you are in charge of it. Don’t let anyone bully or prod you into signing something you aren’t comfortable with.
Credit Repair is almost always a scam. There are ways to get correct bad information removed from your credit report. If the information is correct, those methods are illegal. There are two legal methods to repair your credit. First, stop generating bad credit. Make your payments on time and eventually, the bad items will fall off. Second, write letters disputing the actual incorrect items on your credit report. There are no quick fixes, and anybody telling you different is flirting with a jail sentence, possibly yours.
How do you avoid the scammers?
There is no magic bullet to kill debt. You’re not fighting a werewolf, you’re fighting a lifetime of bad or unfortunate choices and circumstances. It’s important to keep a realistic outcome in mind.
Update: This post has been included in the Carnival of Debt Reduction.