What would your future-you have to say to you?
The no-pants guide to spending, saving, and thriving in the real world.
What would your future-you have to say to you?

We failed Christmas Budgeting 101 this year. I haven’t totaled the damage, yet, but we have spent at least $500 more than we had planned.
It hurt.
Next year, we’re going to handle the Christmas budget differently. This year’s model isn’t working. It’s a lot like pushing a car down a hill to get it started, but ignoring the cliff at the bottom.
1. Use cash. A huge part of our problem was that Capital One is helping us celebrate. It’s horrible, because we both know we shouldn’t be using a credit card, for exactly this reason, but we can’t seem to make the transition back away from the plastic. Part of the reason is that Amazon and ThinkGeek don’t accept cash, and part of it is convenience. Don’t get me wrong, we’re not carrying a balance on the card, but it’s still far too easy to overspend.
2. Communicate! If our gift budget is $500, and I spend $300 online while she’s busy spending $300 in stores, out budget is shot. Worse, if we spend that money buying stuff for the same people, our budget is shot before our shopping is done. A little bit of this happened to us this year.
3. Explore atheism. There really is no more effective wa
y to cut down holiday expenses than to eliminate the holiday completely. This may not be the best answer for everyone, but it’s effective. On the other hand, I know several atheists who celebrate Christmas as much as anyone else. This probably isn’t a good alternative for most people.
3, Take 2. Cut back on “stuff”. My kids have more toys than they can play with. My kids’ parents have more toys than they can play with. Do we really need more? Wouldn’t it be better to spend the money I’d normally use to buy my wife a present on a series of date nights, spread out through the year? I could take my kids to Feed My Starving Children so they can understand how privileged they are and how much the things they take for granted are really worth.
There are so many other ways to celebrate a holiday that has turned into a national orgy of consumerism. Next year, we’ll be trying some of the alternatives.
Regardless of the economic climate, it is always a savvy move to assess your expenditure and look for ways to cut your energy costs. Small changes can make a big difference to your energy efficiency and reduce your outgoings significantly.
1. Know Your Accurate Energy Usage
Do not pay for estimated resources. Using a smart meter will tell your exact energy consumption and means you simply pay for your actual confirmed gas usage. So many customers are unknowingly trapped into paying for estimated energy, which can be very costly.
2. Secure an Suitable Tariff
Once you have established your actual gas and electric consumption using a smart meter, speak your energy supplier regarding the various available tariffs.
There are over 120 tariffs available for energy in the UK and there is definitely one to suit all households. Being more assertive in this area can save you money instantly.
3. Let There Be (Energy Efficient) Light
Lighting accounts for up to 40 per cent of our individual electricity bills.
Change light bulbs to energy saving bulbs for a progressive way of reducing your energy expenses. As energy efficient bulbs last ten times longer than normal high-watt bulbs, any cost in making this switch will be quickly recuperated.
Although many days in the UK are dismal, cleaning windows and opening blinds means that rooms can generally be lit with natural light.
4. Don’t Tumble Dry
Tumble drying your clothes is one of the most financially and environmentally expensive appliance usages. Though energy efficient products are now available, try to make use of any other means you have for drying clothes.
During the winter months, fill indoor clothing racks and radiators within items to be dried. Summer washing is generally less of a problem, with warmer temperatures meaning you can hang loads of washing outside to dry naturally.
5. Switch Off Electrical Equipment
Turning your electronic equipment off at night can cause impressive yearly reductions in your expenditure. Encourage the family to turn all laptops, consoles and computers off during the night, and unplug phone chargers when not in use.
Simply switching off a computer overnight saves £35 on the cost of running the equipment 24 hours over the course of a year. Once you have factored in the number of computers and other electronic equipment in your home, this could amount to quite a saving.
6. Moderate Your Heating
Turn your heating down by just one degree. Such an unnoticeable alteration to your thermostat holds the potential to cut your energy bills by a whopping £55 per year.
Enhance your savings by becoming more energy efficient. Rather than switching on heating and cooling systems, use doors and windows to regulate temperature.
7. Invest In Energy Saving Appliances
Most appliances on the market now offer detailed insight into their environmental impact. Buying eco-friendly products not only benefits the climate, it also benefits your pocket. The lower the amount of energy the appliances consume always equals lower energy bills for your household.
8. Reduce Water Waste
A dripping tap can cost up to £400 per year. Paying out for plumbing services now will definitely save on your water bill.
Rather than bathing daily, swap alternate baths for showers. Showers typically use 35 litres of water, whereas baths take more than double this amount at 80 litre of water per tub. Though this varies depending on the type of your shower, according to South Staffs Water, power showers still save approximately 20 litres on the average bath.
9. Replace Your Old Boiler
If your home currently uses an old G-rated boiler, of 15 years of age or more, then you may find that investing in a new A-rated boiler will save you money long term.
Gas burning boilers eat energy and money and are a costly way of fuelling your home. The government currently offers £400 to those who are looking to purchase a new energy efficient boiler, with companies such as British Gas doubling this grant.
10. Insulate Your Home
Alongside grants for new A-rated boilers, companies are being encouraged by the government to offer discounted (and free) loft and wall cavity insulation. Take the time to see if you are eligible for this as it can make your home significantly warmer, reducing your reliance on central heating.
Be assertive to how you are using resources within your home, small changes can make a big ecological and economic difference.
This is a guest post.
Today, I am continuing the series, Money Problems: 30 Days to Perfect Finances. The series will consist of 30 things you can do in one setting to perfect your finances. It’s not a system to magically make your debt disappear. Instead, it is a path to understanding where you are, where you want to be, and–most importantly–how to bridge the gap.
I’m not running the series in 30 consecutive days. That’s not my schedule. Also, I think that talking about the same thing for 30 days straight will bore both of us. Instead, it will run roughly once a week. To make sure you don’t miss a post, please take a moment to subscribe, either by email or rss.
On this, Day 9, we’re going to talk about health insurance.
The first thing to understand is that there is a difference between health care and health insurance. Health care is what the doctors do. Health insurance is when the insurance companies pay for it. Or don’t. They are not the same thing. I won’t be addressing who should get care or who should be paying for insurance. That’s political and I try to avoid that here.
I won’t spend much time discussing health care as a “right”. It’s not. If a right requires somebody to actively do something for you, it’s not a right. It can’t be. The logical conclusion of requiring somebody to provide you care gets to be a intellectual exercise to be completed elsewhere. That, too, is political.
What I will discuss are the components of a health insurance plan is the U.S. and what to watch out for when planning your insurance coverage.
This is the amount you pay for your health insurance. For people with employer-sponsored insurance, this is usually paid out of each paycheck, deducted pre-tax. For those with an individual plan, it’s almost always a monthly payment. There generally isn’t much you can do to lower this much. Most employers offer, at most, 2-3 options, ranging from a good plan for a high premium to “we’ll mail you leeches if we think you’re dying” for a much smaller price.
This is a flat fee paid out of pocket when you get medical care. Depending on your plan and the type of visit, this could be $10-50 or higher. For example, with a plan I participated in recently, the copay was $15 for an office visit, $25 for urgent care, and $100 for an emergency room visit. The office visit and urgent care visit were billed the same amount to the insurance company, so the price difference was entirely arbitrary. Currently, all health insurance plans are required to pay preventative care visits at 100%, meaning there is no copay.
This is the payment split between the insurance company and the insured. 80/20 is a common split for plans with coinsurance. That means the insurance company will pay just 80% of the bill, until the insured has paid the entire out-of-pocket maximum. After that, the coverage is 100%.
This is the amount that an insurance company won’t pay. It has to be covered by the insured before the insurance company does anything. For example, if you have an insurance plan with a $25 copay, 80/20 coinsurance and a $100 deductible, and paying for an office visit costing $600 would look something like this: $25 for the copay, followed by $75 to max out the copay, leaving $500 to be split 80/20 or $400 paid by the insurance company and $100 paid by the insured. That office visit would cost $200 out-of-pocket. The next identical visit would be cheaper because the deductible is annual and doesn’t get paid per incident. That one would cost $115 out of pocket.
Health Savings Account. For people with a high-deductible plan–that is, a plan with a deductible of at least $1200 in 2011–they are eligible to open an HSA. This is a savings account dedicated to paying medical expenses, excluding OTC medication. It can be used for vision, dental, or medical care. Payroll contributions are taken pre-tax, which makes it a more affordable way to afford major medical expenses. Unfortunately, there are annual contribution limits. Currently $3050 for an individual account and $6150 for a family account. HSAs do not expire, so you can contribute now, and save the money for medical expenses after retirement.
Flexible Spending Account. This is similar to an HSA, but the contributed funds evaporate at the end of the year. It’s “use it or you’re screwed” plan.
If you’re not getting health insurance through your employer or another group, you are on an individual plan. These cost more because they A) don’t benefit from the economy of scale presented by getting 50 or 100 or 1000 people on the same plan, and B) you don’t have an employer subsidizing your premium.
If your employer provides health insurance, you have an employer-sponsored plan. Possibly the fastest way to correct problems with the health insurance industry would be to make individual plan premiums tax-deductible, while eliminating that deduction for employers and letting insurance companies work across state lines. That would eliminate the mutated pseudo-market we have right now, and force the insurance companies to compete for your business. Honest competition is the most sure way to increase efficiency and service while reducing costs. It beats “one payer” or “socialized” care which add overhead to the process and hide the premiums in increased taxes.
Most employer-sponsored plans only allow you to make changes at a specific time of the year, unless you have a “life changing event”, like marriage, divorce, death, or children.
After you use your health insurance, the company will send an EOB, showing you what was billed, what they paid, and what you’ll be responsible for. It’s fascinating to see the difference between what gets billed by the doctor and what the insurance company is willing to pay, by contract. You should read this, to at least understand what you are consuming and how much is getting paid for you.
If your insured care cost more than your maximum dollar limit, or maximum annual limit, the insurance company stops paying. this was supposed to be going away under the Patient Protection and Affordable Care Fraud Act. Unfortunately, if an insurance company offers a crap plan, they have been allowed to apply for waivers based on the fact that they offer a crap plan. The deciding factor in whether the waiver is granted seems to be the amount of the political contributions the insurance company has made to the correct political entities, but maybe I’m just bitter.
This is the most you will have to pay directly with coinsurance. After you pay this amount, the insurance company will cover 100% of expenses, subject to the maximum limit.
The Consolidated Omnibus Budget Reconciliation Act of 1985 is, in short, an opportunity to continue your employer-sponsored health plan–minus the subsidy–after you have left the employer. It’s expensive, but it keeps you covered, and will eliminate issue with pre-existing conditions when you get a new plan.
This is an extremely-high-deductible plan, typically $10,000 or more. For the people who can’t afford coverage, this is insurance-treated-as-insurance. It’s coverage when you absolutely need it, not when you feel a bit ill. $10,000 isn’t a bankruptcy-level bill, while $100,000 usually is. This plan prevent medical bankruptcy for a small monthly fee. For the people who got screwed by a PPAACFA waiver, it bridges the gap between a plan that’s useful for minor things and protection when something goes really wrong.
Now that we’ve looked at the terms you need to understand, we’re going to talk about some things to check before deciding what coverage is right for you.
Do you need coverage for yourself, or yourself and your family? If you and your spouse are both working, make sure to run the math for every possible combination that will cover everyone. Is it cheaper to have one of you cover yourself and the kids, while the other just gets an individual plan?
It’s really easy to blow through a $3000 annual maximum. If you’ve got a low annual max, look into a supplemental catastrophic plan.
For years, my wife paid for insurance that covered herself and the kids, while I covered myself. When we were expecting brat #3, I added her to my insurance plan, without having her cancel hers. When the bill came, my insurance plan covered the coinsurance and deductible, which saved us thousands of dollars when the baby was born.
If you’ve got a pre-existing condition, it can be difficult to get insurance if you don’t already have coverage. This makes sense. It prevents someone from corrupting the idea of insurance by waiting until something goes really wrong before getting a plan. Without this, all of the insurance companies would be bankrupt in a year. This is one of the biggest benefits of COBRA. It’s a short-term bridge plan that eliminates the idea of a pre-exisiting condition deadbeat. If you’ve got insurance, you can transfer to a different plan. If you don’t, you can’t.
Your homework today is to get a copy of the details of your health insurance and look up all of the above terms and situations. How well are you covered? Did anything surprise you?
This was a guest post I wrote last year to answer the question posed by the Yakezie blog swap, “Name a time you splurged and were glad you did.”
There are so many things that I’ve wanted to spend my money on, and quite a few that I have. Just this week, we went a little nuts when we found out that the owner of the game store near us was retiring and had his entire stock 40% off. Another time, we splurged long-term and bought smartphones, more than doubling our monthly cell phone bill.
This isn’t about those extravagances. This is about a time I splurged and was glad I did. Sure, I enjoy using my cell phone and I will definitely get a lot of use out of our new games, but they aren’t enough to make me really happy.
The splurge that makes me happiest is the vacation we took last year.
Vacations are clearly a luxury. Nonessential. Unnecessary. A splurge.
When we were just a year into our debt repayment, we realized that, not only is debt burnout a problem, but our kids’ childhoods weren’t conveniently pausing themselves while we cut every possible extra expense to get out of debt. No matter how we begged, they insisted on continuing to grow.
Nothing we will do will ever bring back their childhoods once they grow up or—more importantly—their childhood memories. They’ll only be children for eighteen years. That sounds like a long time, but that time flies by so quickly.
We decided it was necessary to reduce our debt repayment and start saving for family vacations.
Last summer, we spent a week in a city a few hours away. This was a week with no internet access, no playdates, no work, and no chores. We hit a number of museums, which went surprisingly well for our small children. Our kids got to climb high over a waterfall and hike miles through the forest. We spent time every day teaching them to swim and play games. Six months later, my two year old still talks about the scenic train ride and my eleven year old still plays poker with us.
We spent a week together, with no distractions and nothing to do but enjoy each other’s company. And we did. The week cost us several extra months of remaining in debt, but it was worth every cent. Memories like we made can’t be bought or faked and can, in fact, be treasured forever.
In this installment of the Make Extra Money series, I’m going to show you how to set up a WordPress site. I’m going to show you exactly what settings, plugins, and themes I use. I’m not going to get into writing posts today. That will be next time.
I use WordPress because it makes it easy to develop good-looking sites quickly. You don’t have to know html or any programming. I will be walking through the exact process using Hostgator, but most hosting plans use CPanel, so the instructions will be close. If not, just follow WordPress’s 5 minute installation guide.
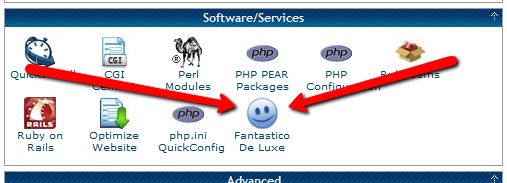
Assuming you can follow along with me, log in to your hosting account and find the section of your control panel labeled “Software/Service”. Click “Fantastico De Luxe”.

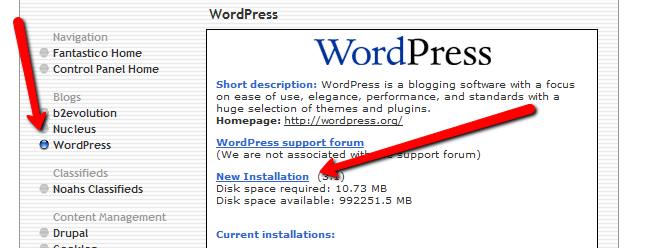
On the Fantastico screen, click WordPress, then “New Installation”.
On the next screen, select your domain name, then enter all of the details: admin username, password, site name, and site description. If you’ll remember, I bought the domain http://www.masterweddingplanning.net. I chose the site name of “Master Wedding Planning” and a description of “Everything You Need to Know to Plan Your Wedding”.
Click “install”, then “finish installation”. The final screen will contain a link to the admin page, in this case, masterweddingplanning.net/wp-admin. Go there and log in.
After you log in, if there is a message at the top of the screen telling you to update, do so. Keeping your site updated is the best way to avoid getting hacked. Click “Please update now” then “Update automatically”. Don’t worry about backing up, yet. We haven’t done anything worth saving.
Next, click “Settings” on the left. Under General Settings, put the www in the WordPress and site URLs. Click save, then log back in.
Click Posts, then Categories. Under “Add New Category”, create one called “Misc” and click save.
Click Appearance. This brings you to the themes page. Click “Install Themes” and search for one you like. I normally use Headway, but before I bought that, I used SimpleX almost exclusively. Your goal is to have a simple theme that’s easy to maintain and easy to read. Bells and whistles are a distraction.
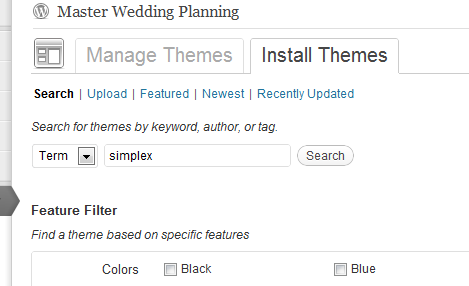
Click “Install”, “Install now”, and “Activate”. You now have a very basic WordPress site.
A plugin is an independent piece of software to make independent bits of WordPress magic happen. To install the perfect set of plugins, click Plugins on the left. Delete “Hello Dolly”, then click “Add new”.
In the search box, enter “plugin central” and click “Search plugins”. Plugin Central should be the first plugin in the list, so click “install”, then “ok”, then “activate plugin”. Congratulations, you’ve just installed your first plugin.
Now, on the left, you’ll see “Plugin Central” under Plugins. Click it. In the Easy Plugin Installation box, copy and paste the following:
 All in One SEO Pack
 Contact Form 7
 WordPress Database Backup
 SEO SearchTerms Tagging 2
 WP Super Cache
 Conditional CAPTCHA for WordPress
 date exclusion seo
 WP Policies
 Pretty Link Lite
 google xml sitemaps
 Jetpack by WordPress.com
Click “install”.
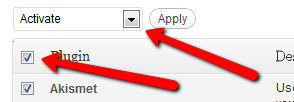
On the left, click “Installed Plugins”. On the next screen, click the box next to “Plugins”, then select “Activate” from the dropdown and click apply.
Still under Plugins, click “Akismet Configuration”. Enter your API key and hit “update options”. You probably don’t have one, so click “get your key”.
The only tool I worry about is the backup. It’s super-easy to set up. Click “Tools”, then “Backup”. 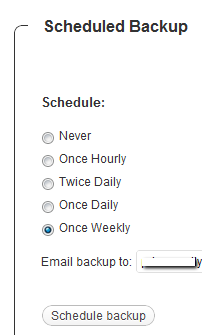
Scroll down to “Schedule Backups”, select weekly, make sure it’s set to a good email address and click “Schedule Backup”. I only save weekly because we won’t be adding daily content. Weekly is safe enough, without filling up your email inbox.
There are a lot of settings we’re going to set. This is going to make the site more usable and help the search engines find your site. We’re going to go right down the list. If you see a section that I don’t mention, it’s because the defaults are good enough.
Set the Default Post Category to “Misc”.
Visit this page and copy the entire list into “Update Service” box. This will make the site ping a few dozen services every time you publish a post. It’s a fast way to get each post indexed by Google.
Click “Save Changes”.
Uncheck everything under “Email me whenever…” and hit save. This lets people submit comments, without actually posting the comments or emailing me when they do so. Every once in a while, I go manually approve the comments, but I don’t make it a priority.
Select “Custom structure” and enter this: /%postname%/
Click save.
Set the status to “Enabled”, then fill out the site title and description. Keep the description to about 160 characters. This is what builds the blurb that shows up by the link when you site shows up in Google’s results.
Check the boxes for “Use categories for META keywords” and “Use noindex for tag archives”.
Click “Update Options”.
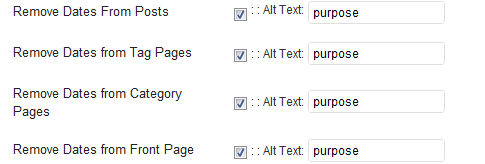
Check the boxes to remove each of the dates and set the alt text to “purpose” or something. This will suppress the date so your posts won’t look obsolete.
This plugin reinforces the searches that bring people to your site. It’s kind of neat. Skip the registration, accept the defaults and hit save.
Scroll to the bottom and click import. We’ll come back to this.
Select “Caching On” and hit save.
Across the top of the screen should be a giant banner telling you to connect to WordPress.com and set up Jetpack. You’ll need an account on WordPress.com, so go there and set one up. After authorizing the site, you’ll be brought back to the Jetpack configuration screen. Click “Configure” under “WordPress.com Stats”. Take the defaults and hit save.
On the contact configuration page, copy the code in the top section. You’ll need this in a moment.
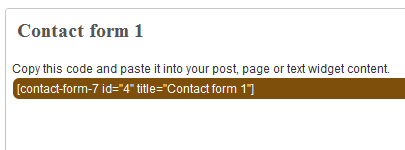
Now, we going to create a couple of static pages. On the left, click “Pages”, then “Add new”.
Name the first page “Contact” and put the contact form code in the body of the page. Hit publish.
Under Appearance, click “Menu”. Enter a menu name and hit save.
Then, under “Pages”, click the box next to “Contact”, “Disclaimer”, and any other policies you’d like to display. Hit save.
Also under Appearance, click “Widgets”. This is where you’ll select what will display in the sidebar. All you have to do is drag the boxes you want from the middle of the page to the widget bar on the right. I recommend Text, Search, Recent Posts, Popular Search Terms and Tag Cloud. In the text box, just put some placeholder text in it, like “Product will go here”. We’ll address this next time.
We’re not going to worry about getting posts in place, yet. That will be the next installment. However, the steps in the next installment could take 2 weeks to implement, and we want Google to start paying attention now. To make that happen, we need to get a little bit of content in place. This won’t be permanent content. It’s only there so Google has something to see when it comes crawling.
To get this temporary, yet legal content, I use eZineArticles. Just go search for something in your niche that doesn’t look too spammy.
Then, click “Posts”, then delete the “Hello World” post. Click “Add new”. Copy the eZine article, being sure to include the author box at the bottom, and hit publish.
To see your changes, you may have to go to Settings, then WP Cache and delete the cache so your site will refresh.
Congratulations! You now have a niche blog with content. It’s not ready to make you any money, yet, but it is ready for Google to start paying attention. In the next installment, I’ll show you how I get real unique content and set it up so Google keeps coming back to show me the love.