Please email me at:
Or use the form below.
[contact-form 1 “Contact form 1”]
The no-pants guide to spending, saving, and thriving in the real world.
In this installment of the Make Extra Money series, I’m going to show you how to set up a WordPress site. I’m going to show you exactly what settings, plugins, and themes I use. I’m not going to get into writing posts today. That will be next time.
I use WordPress because it makes it easy to develop good-looking sites quickly. You don’t have to know html or any programming. I will be walking through the exact process using Hostgator, but most hosting plans use CPanel, so the instructions will be close. If not, just follow WordPress’s 5 minute installation guide.
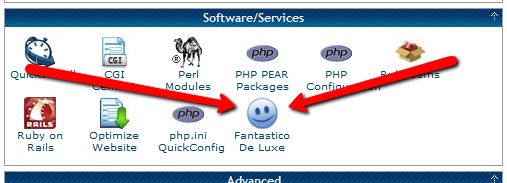
Assuming you can follow along with me, log in to your hosting account and find the section of your control panel labeled “Software/Service”. Click “Fantastico De Luxe”.

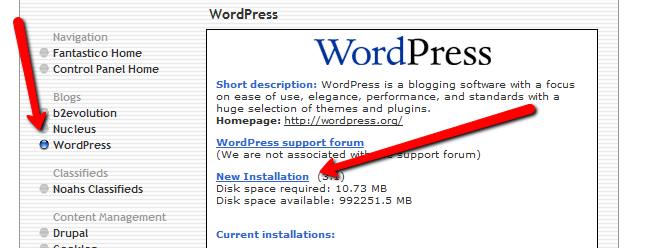
On the Fantastico screen, click WordPress, then “New Installation”.
On the next screen, select your domain name, then enter all of the details: admin username, password, site name, and site description. If you’ll remember, I bought the domain http://www.masterweddingplanning.net. I chose the site name of “Master Wedding Planning” and a description of “Everything You Need to Know to Plan Your Wedding”.
Click “install”, then “finish installation”. The final screen will contain a link to the admin page, in this case, masterweddingplanning.net/wp-admin. Go there and log in.
After you log in, if there is a message at the top of the screen telling you to update, do so. Keeping your site updated is the best way to avoid getting hacked. Click “Please update now” then “Update automatically”. Don’t worry about backing up, yet. We haven’t done anything worth saving.
Next, click “Settings” on the left. Under General Settings, put the www in the WordPress and site URLs. Click save, then log back in.
Click Posts, then Categories. Under “Add New Category”, create one called “Misc” and click save.
Click Appearance. This brings you to the themes page. Click “Install Themes” and search for one you like. I normally use Headway, but before I bought that, I used SimpleX almost exclusively. Your goal is to have a simple theme that’s easy to maintain and easy to read. Bells and whistles are a distraction.
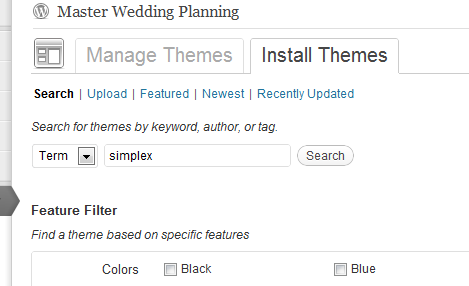
Click “Install”, “Install now”, and “Activate”. You now have a very basic WordPress site.
A plugin is an independent piece of software to make independent bits of WordPress magic happen. To install the perfect set of plugins, click Plugins on the left. Delete “Hello Dolly”, then click “Add new”.
In the search box, enter “plugin central” and click “Search plugins”. Plugin Central should be the first plugin in the list, so click “install”, then “ok”, then “activate plugin”. Congratulations, you’ve just installed your first plugin.
Now, on the left, you’ll see “Plugin Central” under Plugins. Click it. In the Easy Plugin Installation box, copy and paste the following:
 All in One SEO Pack
 Contact Form 7
 WordPress Database Backup
 SEO SearchTerms Tagging 2
 WP Super Cache
 Conditional CAPTCHA for WordPress
 date exclusion seo
 WP Policies
 Pretty Link Lite
 google xml sitemaps
 Jetpack by WordPress.com
Click “install”.
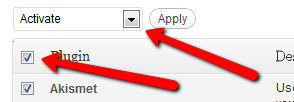
On the left, click “Installed Plugins”. On the next screen, click the box next to “Plugins”, then select “Activate” from the dropdown and click apply.
Still under Plugins, click “Akismet Configuration”. Enter your API key and hit “update options”. You probably don’t have one, so click “get your key”.
The only tool I worry about is the backup. It’s super-easy to set up. Click “Tools”, then “Backup”. 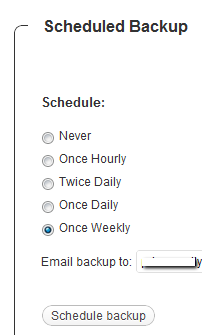
Scroll down to “Schedule Backups”, select weekly, make sure it’s set to a good email address and click “Schedule Backup”. I only save weekly because we won’t be adding daily content. Weekly is safe enough, without filling up your email inbox.
There are a lot of settings we’re going to set. This is going to make the site more usable and help the search engines find your site. We’re going to go right down the list. If you see a section that I don’t mention, it’s because the defaults are good enough.
Set the Default Post Category to “Misc”.
Visit this page and copy the entire list into “Update Service” box. This will make the site ping a few dozen services every time you publish a post. It’s a fast way to get each post indexed by Google.
Click “Save Changes”.
Uncheck everything under “Email me whenever…” and hit save. This lets people submit comments, without actually posting the comments or emailing me when they do so. Every once in a while, I go manually approve the comments, but I don’t make it a priority.
Select “Custom structure” and enter this: /%postname%/
Click save.
Set the status to “Enabled”, then fill out the site title and description. Keep the description to about 160 characters. This is what builds the blurb that shows up by the link when you site shows up in Google’s results.
Check the boxes for “Use categories for META keywords” and “Use noindex for tag archives”.
Click “Update Options”.
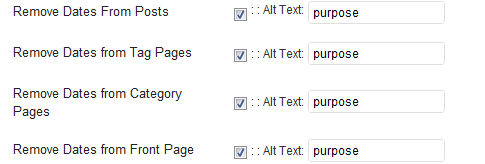
Check the boxes to remove each of the dates and set the alt text to “purpose” or something. This will suppress the date so your posts won’t look obsolete.
This plugin reinforces the searches that bring people to your site. It’s kind of neat. Skip the registration, accept the defaults and hit save.
Scroll to the bottom and click import. We’ll come back to this.
Select “Caching On” and hit save.
Across the top of the screen should be a giant banner telling you to connect to WordPress.com and set up Jetpack. You’ll need an account on WordPress.com, so go there and set one up. After authorizing the site, you’ll be brought back to the Jetpack configuration screen. Click “Configure” under “WordPress.com Stats”. Take the defaults and hit save.
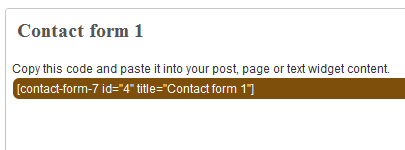
On the contact configuration page, copy the code in the top section. You’ll need this in a moment.
Now, we going to create a couple of static pages. On the left, click “Pages”, then “Add new”.
Name the first page “Contact” and put the contact form code in the body of the page. Hit publish.
Under Appearance, click “Menu”. Enter a menu name and hit save.
Then, under “Pages”, click the box next to “Contact”, “Disclaimer”, and any other policies you’d like to display. Hit save.
Also under Appearance, click “Widgets”. This is where you’ll select what will display in the sidebar. All you have to do is drag the boxes you want from the middle of the page to the widget bar on the right. I recommend Text, Search, Recent Posts, Popular Search Terms and Tag Cloud. In the text box, just put some placeholder text in it, like “Product will go here”. We’ll address this next time.
We’re not going to worry about getting posts in place, yet. That will be the next installment. However, the steps in the next installment could take 2 weeks to implement, and we want Google to start paying attention now. To make that happen, we need to get a little bit of content in place. This won’t be permanent content. It’s only there so Google has something to see when it comes crawling.
To get this temporary, yet legal content, I use eZineArticles. Just go search for something in your niche that doesn’t look too spammy.
Then, click “Posts”, then delete the “Hello World” post. Click “Add new”. Copy the eZine article, being sure to include the author box at the bottom, and hit publish.
To see your changes, you may have to go to Settings, then WP Cache and delete the cache so your site will refresh.
Congratulations! You now have a niche blog with content. It’s not ready to make you any money, yet, but it is ready for Google to start paying attention. In the next installment, I’ll show you how I get real unique content and set it up so Google keeps coming back to show me the love.
 budget” width=”300″ height=”185″ />
Over the next few weeks, I will be going over my budget in detail.
The first section is income, but that’s straightforward. A line for each income source, bi-weekly, monthly and annual totals. Simple.
Before we start, a word on the organization. There are five columns:
The first section I am actually going to address is discretionary spending.
Initially, we used a “virtual envelope” system. We had a spreadsheet and every time something was spent in this category, we entered the amount and stopped when the category was spent. Didn’t work. We are going on a pure, cash-only system as of the first of the year. No money, no spendy.
Today, I am continuing the detailed examination of my budget. Please see part one to catch up.

This time, I’m going to look at my monthly bills. These are predictable and recurring expenses, though not all of them are entirely out-going.
Let’s dig in: [Read more…] about Budget Lesson, Part 2
It’s been a month(again!) since I’ve written a post for the budget series, so I’ll be continuing that today. See these posts for the history of this series.
This time, I’m looking at how to reduce my “set aside” funds. These are the categories that don’t have specific payout amounts and happen at irregular intervals. One of the convenient features of our set-aside funds–also a feature of our non-monthly bills–is that the money sits in our checking account, providing a buffer against overdrafts. The buffer is big enough that I can withdraw our entire month’s discretionary budget on the first of the month.
I’ve taken a hard look at most of the bills over time, so there isn’t always a lot to cut. Next time, I’ll be addressing our discretionary spending.

Today is the 33rd anniversary of the death of Elvis, so I’m bringing you the “Elvis is Dead” edition of the Carnival of Personal Finance.
What can the King teach us about finance? The immediate lesson is, of course, to not let success destroy you or your life. Always remember what is important.
“Adversity is sometimes hard upon a man; but for one man who can stand prosperity, there are a hundred that will stand adversity.” -Elvis Presley
Before we get into the carnival, please take a moment to subscribe, either by rss or by email. If you are on twitter, please follow me at @LiveRealNow.
“When I was a child, ladies and gentlemen, I was a dreamer. I read comic books, and I was the hero of the comic book. I saw movies, and I was the hero in the movie. So every dream I ever dreamed has come true a hundred times…I learned very early in life that: ‘Without a song, the day would never end; without a song, a man ain’t got a friend; without a song, the road would never bend – without a song.’ So I keep singing a song. Goodnight. Thank you.”
-From his acceptance speech for the 1970 Ten Outstanding Young Men of the Nation Award. Given at a ceremony on January 16, 1971
Craig Ford from Money Help For Christians presents How to Buy Cars With Cash. This is great advice. My car will be paid off in the next few months and I will be doing exactly this.
FMF from Free Money Finance presents Are Tattoos at Work Really That Acceptable? Do tattoos limit your career? I reference this graphic when thinking about a tattoo.
Pop from Pop Economics presents Getting a raise: The negotiation. It’s always best to raise your top line as high as possible. Bringing in more money is far more effective that simply reducing your expenses.