Please email me at:
Or use the form below.
[contact-form 1 “Contact form 1”]
The no-pants guide to spending, saving, and thriving in the real world.
A few years ago, my wife and I were discussing life improvement, the options in front of us, and our future goals. She said she felt trapped by the scope of our goals and didn’t know where to start. That led to a discussion on

achieving our goals, which led to this.
Examine your life. Take stock of every aspect of your life. What pleases you? What upsets you? What do you do that adds no value to your life? Or worse, removes value? What do you do that adds the most value? What would you like to change? Eliminate? Improve? Count the small things. Nothing is insignificant. Write it all down and be specific.
Analyze your list. Are there any obvious patterns? Is there a single thread that is making you miserable or affecting multiple other items? Would eliminating 1 factor improve 90% of the rest? Is there a bad job or a toxic relationship ruining your happiness? Be honest and be critical.
What are your dreams? Where would you like to be in six months? A year? 5? 10? How would you like to retire? When? Write it all down. This is now your life plan.
Set goals. Set concrete, definable goals. Set goals that have an obvious success point. When you reach your goal, you want to be able to point it out. “Lose weight” is not a goal. “Lose 50 pounds in the next year” is a measurable, definable, concrete goal. Set incremental goals to reach your larger goals and, more importantly, your dreams.
Here’s an example:
Dream: Retire at 50.
When you are setting up your goal plan, make sure to include the analyzed items mentioned earlier. These are the things that will make today happier for you.
Now, you have examined your life. You have analyzed the results. You’ve gathered your dreams and compiled a goal plan based on your hopes, dreams, goals and desires. What’s next?
We’re going to take a page from David Allen. It’s time to Get Things Done. What do you have to do next to reach your goals? What is the next step? Don’t let yourself be overwhelmed by the scope of the entire list. Select one single item from your plan and look for the one single next step to make on the path to that goal.
Going back to the retirement goal plan, the next step towards a 10% raise could be researching salaries for your job description in your area to give you ammunition in the meeting with your boss. It could be updating your resume to hunt for a better paying job, or even just studying up on some resume tips.
If you want to run a marathon next year, the next step is to start walking every day to train your body.
If you want to improve communication with your spouse, the next step is probably to let her know.
If you want to eliminate debt, the next step may be setting up a budget or canceling unnecessary services like cable.
Every goal has a path leading to it. If that’s not true, you haven’t defined a concrete measurable goal.
Examine your life. Analyze your situation. Know WHAT you want. Know what you want to change. Set goals to get there, one step at a time. Take a single step towards your goals.
Then take another.
What are you doing to reach your goals and improve your life?
In this installment of the Make Extra Money series, I’m going to show you how to set up a WordPress site. I’m going to show you exactly what settings, plugins, and themes I use. I’m not going to get into writing posts today. That will be next time.
I use WordPress because it makes it easy to develop good-looking sites quickly. You don’t have to know html or any programming. I will be walking through the exact process using Hostgator, but most hosting plans use CPanel, so the instructions will be close. If not, just follow WordPress’s 5 minute installation guide.
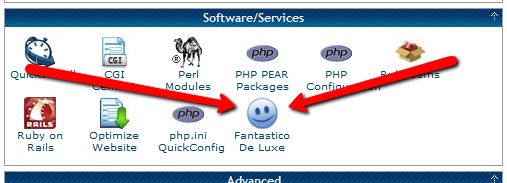
Assuming you can follow along with me, log in to your hosting account and find the section of your control panel labeled “Software/Service”. Click “Fantastico De Luxe”.

On the Fantastico screen, click WordPress, then “New Installation”.
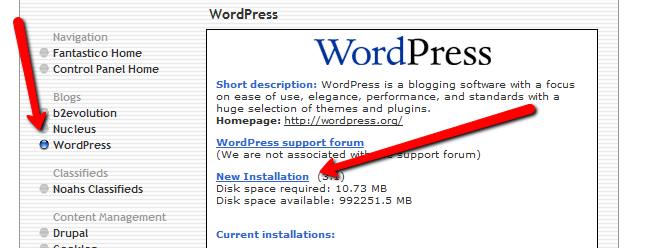
On the next screen, select your domain name, then enter all of the details: admin username, password, site name, and site description. If you’ll remember, I bought the domain http://www.masterweddingplanning.net. I chose the site name of “Master Wedding Planning” and a description of “Everything You Need to Know to Plan Your Wedding”.
Click “install”, then “finish installation”. The final screen will contain a link to the admin page, in this case, masterweddingplanning.net/wp-admin. Go there and log in.
After you log in, if there is a message at the top of the screen telling you to update, do so. Keeping your site updated is the best way to avoid getting hacked. Click “Please update now” then “Update automatically”. Don’t worry about backing up, yet. We haven’t done anything worth saving.
Next, click “Settings” on the left. Under General Settings, put the www in the WordPress and site URLs. Click save, then log back in.
Click Posts, then Categories. Under “Add New Category”, create one called “Misc” and click save.
Click Appearance. This brings you to the themes page. Click “Install Themes” and search for one you like. I normally use Headway, but before I bought that, I used SimpleX almost exclusively. Your goal is to have a simple theme that’s easy to maintain and easy to read. Bells and whistles are a distraction.
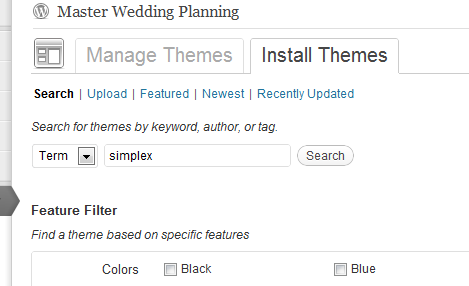
Click “Install”, “Install now”, and “Activate”. You now have a very basic WordPress site.
A plugin is an independent piece of software to make independent bits of WordPress magic happen. To install the perfect set of plugins, click Plugins on the left. Delete “Hello Dolly”, then click “Add new”.
In the search box, enter “plugin central” and click “Search plugins”. Plugin Central should be the first plugin in the list, so click “install”, then “ok”, then “activate plugin”. Congratulations, you’ve just installed your first plugin.
Now, on the left, you’ll see “Plugin Central” under Plugins. Click it. In the Easy Plugin Installation box, copy and paste the following:
 All in One SEO Pack
 Contact Form 7
 WordPress Database Backup
 SEO SearchTerms Tagging 2
 WP Super Cache
 Conditional CAPTCHA for WordPress
 date exclusion seo
 WP Policies
 Pretty Link Lite
 google xml sitemaps
 Jetpack by WordPress.com
Click “install”.
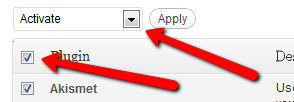
On the left, click “Installed Plugins”. On the next screen, click the box next to “Plugins”, then select “Activate” from the dropdown and click apply.
Still under Plugins, click “Akismet Configuration”. Enter your API key and hit “update options”. You probably don’t have one, so click “get your key”.
The only tool I worry about is the backup. It’s super-easy to set up. Click “Tools”, then “Backup”. 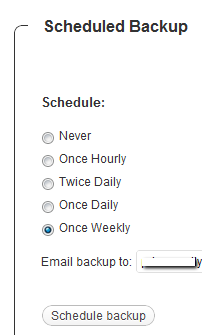
Scroll down to “Schedule Backups”, select weekly, make sure it’s set to a good email address and click “Schedule Backup”. I only save weekly because we won’t be adding daily content. Weekly is safe enough, without filling up your email inbox.
There are a lot of settings we’re going to set. This is going to make the site more usable and help the search engines find your site. We’re going to go right down the list. If you see a section that I don’t mention, it’s because the defaults are good enough.
Set the Default Post Category to “Misc”.
Visit this page and copy the entire list into “Update Service” box. This will make the site ping a few dozen services every time you publish a post. It’s a fast way to get each post indexed by Google.
Click “Save Changes”.
Uncheck everything under “Email me whenever…” and hit save. This lets people submit comments, without actually posting the comments or emailing me when they do so. Every once in a while, I go manually approve the comments, but I don’t make it a priority.
Select “Custom structure” and enter this: /%postname%/
Click save.
Set the status to “Enabled”, then fill out the site title and description. Keep the description to about 160 characters. This is what builds the blurb that shows up by the link when you site shows up in Google’s results.
Check the boxes for “Use categories for META keywords” and “Use noindex for tag archives”.
Click “Update Options”.
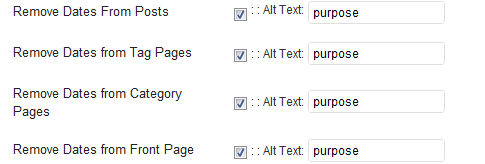
Check the boxes to remove each of the dates and set the alt text to “purpose” or something. This will suppress the date so your posts won’t look obsolete.
This plugin reinforces the searches that bring people to your site. It’s kind of neat. Skip the registration, accept the defaults and hit save.
Scroll to the bottom and click import. We’ll come back to this.
Select “Caching On” and hit save.
Across the top of the screen should be a giant banner telling you to connect to WordPress.com and set up Jetpack. You’ll need an account on WordPress.com, so go there and set one up. After authorizing the site, you’ll be brought back to the Jetpack configuration screen. Click “Configure” under “WordPress.com Stats”. Take the defaults and hit save.
On the contact configuration page, copy the code in the top section. You’ll need this in a moment.
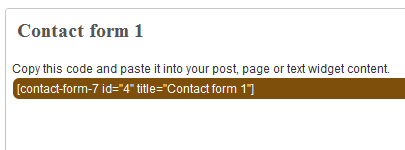
Now, we going to create a couple of static pages. On the left, click “Pages”, then “Add new”.
Name the first page “Contact” and put the contact form code in the body of the page. Hit publish.
Under Appearance, click “Menu”. Enter a menu name and hit save.
Then, under “Pages”, click the box next to “Contact”, “Disclaimer”, and any other policies you’d like to display. Hit save.
Also under Appearance, click “Widgets”. This is where you’ll select what will display in the sidebar. All you have to do is drag the boxes you want from the middle of the page to the widget bar on the right. I recommend Text, Search, Recent Posts, Popular Search Terms and Tag Cloud. In the text box, just put some placeholder text in it, like “Product will go here”. We’ll address this next time.
We’re not going to worry about getting posts in place, yet. That will be the next installment. However, the steps in the next installment could take 2 weeks to implement, and we want Google to start paying attention now. To make that happen, we need to get a little bit of content in place. This won’t be permanent content. It’s only there so Google has something to see when it comes crawling.
To get this temporary, yet legal content, I use eZineArticles. Just go search for something in your niche that doesn’t look too spammy.
Then, click “Posts”, then delete the “Hello World” post. Click “Add new”. Copy the eZine article, being sure to include the author box at the bottom, and hit publish.
To see your changes, you may have to go to Settings, then WP Cache and delete the cache so your site will refresh.
Congratulations! You now have a niche blog with content. It’s not ready to make you any money, yet, but it is ready for Google to start paying attention. In the next installment, I’ll show you how I get real unique content and set it up so Google keeps coming back to show me the love.
For those of you who haven’t been following along, I’m in debt. Starting 13 years ago, when I was 19, I managed to bury myself in debt, until I decided I’d had enough of that…almost 2 years ago.
Why?
It wasn’t because of college expenses, though they contributed to my debt level. I was in debt before I went to college. Heck, I was a daddy before I went to college.
It wasn’t because of major medical procedures. The only major medical procedures we’ve ever had were the births of our children, and we had two of them well after we built our shackles.
It wasn’t because we bought more house than we could afford. We own a modest house that we bought before the bubble started.
Then what was it? Why did we do the things we did that have financially crippled us for so long?
It was a combination of things, crowned by a glorious lack of financial sophistication. As I wrote in No Brakes, neither of us had the early training to really understand our financial decisions. We knew bills need to be paid, but what was the difference if the money came from a credit card versus our checking account? Why did it matter if we carried a balance on the cards, as long as we could make the payments? What’s wrong with just making the minimum payment?
Naïve. Unsophisticated.
That day-to-day lack of sophistication was only part of the problem, and it wasn’t the biggest part. We made a lot mistakes, but they were all small. Before 2001, I think our total was about $5000. Too much, but not painful.
Between the fall of 2001 and the winter of 2002, we took our naïve decision-making process and ran with it. It was a full-scale mistake marathon.
That year, we built an addition on our house, because a full dining room and a bigger kitchen would make our house so much more livable and it was cheaper than buying a home, new. Oh, and since the difference between the mandatory crawlspace and a full basement room was just a few rows of concrete blocks, let’s expand it. Wait, don’t bedrooms require walls, sheetrock, windows, closets, paint, furniture, and electricity?
That was also the year that the car companies all jumped on the 0% loan fad. In case you don’t remember, that was the program that meant you could get a 0% loan on a new car if you picked up a 3 year term on your loan. At 22, making maybe $45,000 combined, we decided that buying a $35,000 truck was a good idea. To save money. Rationalization is wonderful. Or at least, effective.
That summer, we got married. We did a phenomenal job getting married on the cheap. We had about 100 guests, a park to get married in, flowers, food, and a hall to eat and dance in, for about $3000. The problem was, we didn’t have $3000. We didn’t have the $1500 + activities for our 10 day honeymoon on a Caribbean cruise, either, though I still plan on returning to St. Thomas.
None of those individual payments were terrible. The biggest problem was that we piled them all so close together that we never had time to absorb their impact before taking on the next obligation. When we did realize how much we had to pay, we made up for it by only buying big things that came with a “0% for a year” deal, like our living room set, our carpet, and our dining room table.
Then, when we finally did pay something off, or came into more money, we’d immediately expand our lifestyle to fill the void. The month we paid off our truck, I got a significant raise. Did we use it to pay off some other debt? Of course not, we bought a new car on a six year term.
We had so many opportunities to make bad decisions with our money, and I think we took them all and have suffered for it, since.
If you’re in debt, what made you decide to get that way?
I keep calling these lessons, but they are examples and explanations, more than lessons. Names aside, please see Part 1 and Part 2 to catch up. The Google Doc of this example is here.

This time, I’m going to review my non-monthly bills. These are the bills that have to be paid, but not on a monthly basis. Some are annual, others are quarterly, or even weekly. Every month, the amount–adjusted to the monthly equivalent–is set aside in Quicken.
There aren’t too many items here that can be legitimately and responsibly trimmed.
It’s been a month(again!) since I’ve written a post for the budget series, so I’ll be continuing that today. See these posts for the history of this series.
This time, I’m looking at how to reduce my “set aside” funds. These are the categories that don’t have specific payout amounts and happen at irregular intervals. One of the convenient features of our set-aside funds–also a feature of our non-monthly bills–is that the money sits in our checking account, providing a buffer against overdrafts. The buffer is big enough that I can withdraw our entire month’s discretionary budget on the first of the month.
I’ve taken a hard look at most of the bills over time, so there isn’t always a lot to cut. Next time, I’ll be addressing our discretionary spending.